It happens every year for me, about this time. Christmas is over, the new year upon us and I start to get spring fever. My cats already have it - they have been racing through the house at break-neck speeds, springing up and over furniture. I hear meowling (half meow-half howl) coming from the windowsills as flicking tails part the curtains.I feel like meowling myself right now!The arrival in the mail of the new Jung's seed catalog isn't helping - I am planning to get that new hydrangea on the cover...I could use a vacation but none are in sight for me. Still, I can dream!If I could be on my way any where right now, it would be the French Riviera - how about you?Here's a fun collage I put together of my dream vacation on the Riviera.
 Check out this deal I got at TJ Maxx last Saturday. Can you believe I passed it up, got half way home and drove back to get it, worried it was gone already? A Cuisinart 7 Qt, cast iron in the perfect shade of blue. I already made the best beef veggie stew in it. I smile every time I see it. Oh, the price was $59.99 because of a few hard to see scratches on the lid. I looked up new ones and they are twice that online. I think I scored!
 As work progresses on the family room furniture (the hutch) and the floor is now complete (the tile) I have begun to paint the walls. I chose Waverly's "Cottage Linen White". I know, I know - white can be boring but it's what this room really needs as I want to keep it light and airy. The ceiling is low but I still chose to paint it "Atmosphere Blue" by Restoration Hardware. It worked beautifully and one doesn't even notice it until one sits down and looks up! It like that the blue ceiling adds a little color and interest. I have a couple of swallows (birds) color copied off which I will decoupage to the ceiling in a few spots. I temporarily taped one to the ceiling in my art studio and one of my cats sat and stared at it for hours. I felt sorry for him after awhile and took it down so he'd come out of the spell it had cast over him and he could go eat and sleep like he should have been doing on a rainy weekend afternoon! I have decided to stencil a simple pale blue pattern on the walls in the family room, to break up the expanse of white. ( I am using "Atmosphere Blue", of course.)
It's a simple, small stencil from JoAnn Fabric's craft section. I have added it to one wall so far and love how it looks.
It is very Swedish country.
If I feel the need to soften it, I will brush over it with a coat of RL's "Sunfade". Not even sure if it's sold any more as I have had that can for years! (it's still good to use). It adds a milky white layer that "fades" color and pattern to make it look like it's sat in direct sunlight for 10 years running.


 Yes, there is a difference and I found that out recently! I am working on the family room/dining room. It's a later addition to my cottage - used to be the garage back in it's original form but was converted to a large "everything" room with a wood stove, way before I came along. It had nasty brown carpeting which only got dirtier as the years went on. We carpet cleaned a few times but with 3 people in and out the French doors to the back yard, rainy Seattle weather, many cats, and a few messy eaters, a carpet can take a real beating so one day I ripped it out and vowed I'd live with the cement floor until I could afford new flooring. I did get new flooring - a 16" sand-colored porcelain tile. It was on sale at Home Depot for just 7 cents a sq foot. I had a 20x20 room. I could afford this! But it sat for 3 years before the person who promised to lay it for me did so. Two weeks ago I took 2 vacations days and helped lay the floor. I am still walking into that room dazed and amazed that it got done!!
I chose white grout after being told brown grout would be better. Brown grout would make it look like an 80's Mexican restaurant floor. White was best. I sealed it by hand, on my hands and knees, one Saturday night. Resealed the high traffic areas the next day. I was told NOT to buy another piece of furniture off Craigslist (a friend suggested that I had enough stuff in the house!) but then I found this amazing, well made sofa from the 1930's for $75, which will provide seating near the wood stove. Advice was given to me to decorate the room with colors different from my blue & white I use through the rest of the cottage (my favorite color combination). I tried for weeks to find a green or yellow that would work but nothing seemed right to me. One person after another gave me advice and I'd faithfully follow it until I'd wasted more money and time figuring out that it wasn't right.
What was right was following the advice of a few friends who knew me best and didn't let their own personal preferences get in the way. OF COURSE the room needs to be blue and white - it will then fit in with every other room in the cottage!
It must all flow from room to room.
So, the walls will be white - my signature shade of "Cottage Linen White" by Waverly. It turns out to be the best choice to keep a large room with few windows light and airy. The ceiling will be light blue, and the windows covered with the blue & white toile curtains I used to have in the living room. I also have 12 yards of that toile in upholstery weight in storage. I can use it to recover the sofa. I just saved hundreds of dollars using what I already have.
I will hand paint the furniture white, as is my style. The 2 piece hutch and tables are either new, from the 70's or 40's and are not antiques so I have no problem painting them. In the end, the best choice I made was to NOT listen to anyone else when it came to making my home my own. The best advice from a few friends who knew best, was to follow my own instincts, and so I am.
Stay tuned for progress on each of these projects. Here are a couple of "before" photos so you can see where I am starting from. Everything is pretty raw right now. I have alot of work cut out for me.
 I love this classic e e cummings poem. Here is a free download I designed for you to print off and hang in your studio or give to a loved one!


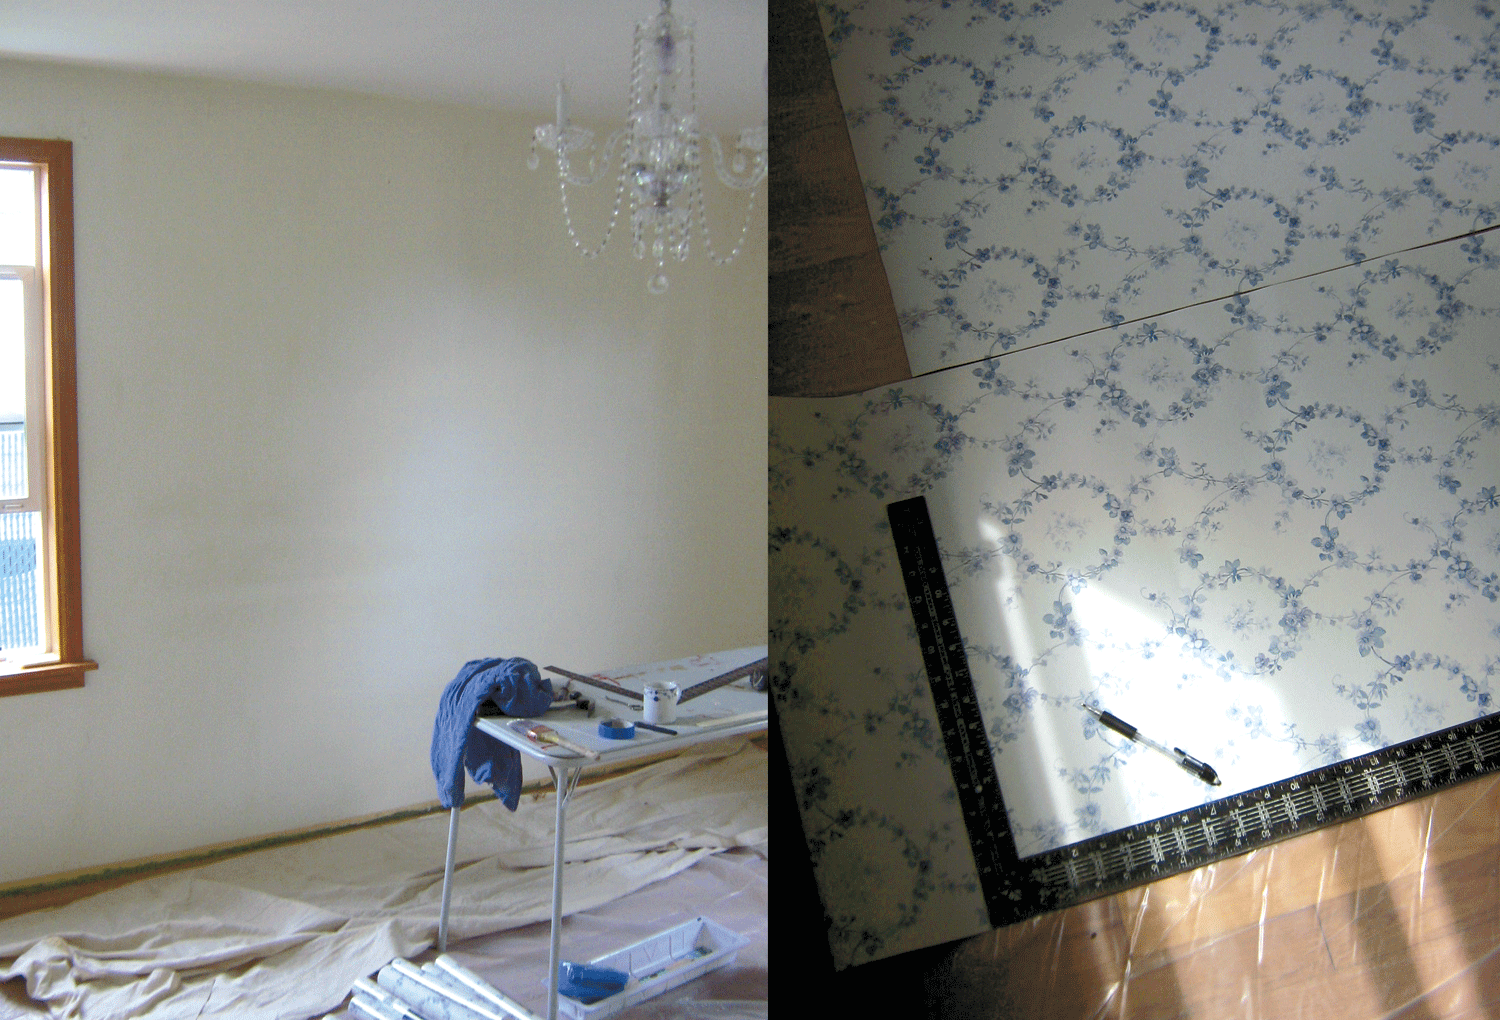
 I have reclaimed my house from my ex-boyfriend and his daughter, who have, for the most part, moved out now.I also decided that 6 years sleeping upstairs under the eaves in a twin sized bed, where I could only stand upright in the center 4' of the room, with inadequate lighting and cold and hot temp extremes was enough so I decided to take over his old room downstairs. It's a nice room - not big by any means, but bigger and airier then what I had as my room for years. I can also stand upright in it - bonus!! It's also near the bathroom - and I could finally graduate to a queen sized bed! (the stairs to my old room were narrow and poky and one could only fit a twin mattress up them).I decided to make this new room my haven - a dreamy space I look forward to retiring to each night and love waking up to each morning.I wanted to try wallpaper for a change, instead of just paint.I found a website called wallpapermore.com where I found some beautiful papers, some for $22 a double roll/pre-pasted. The one I chose was one of the lower priced patterns.I found the queen sized mattress set off craigslist for $20 - this woman was moving to Hawaii and she couldn't pay over-seas shipping costs on her furniture so she was selling it all.The queen bed frame was $95, also off craigslist. It was a hideous green so I spray painted it white.All the bedding was found at Ross, Marshalls, TJ Maxx or eBay, at great prices!
The cotton sateen duvet in pale Delphinium blue was $30 and the Laura Ashley white cotton bedskirt with satin stripes was $14 because it had a small tear in the seam which took me 2 minutes to repair! The RL white cotton blanket was $19.99 and the queen down-alternative comforter was $39. Each paycheck, since March, I shopped for a few more items, in anticipation for the day when I could claim the room as my own and get to work on it.
I gave myself one weekend to get the wallpaper up. Having never done it before, I was a bit nervous but knew it had to be done in order to create this special haven I saw in my mind's eye.The few supplies I needed were under $20 at Lowes and I was ready to go!
I painted wallpaper primer on the walls the Friday night before the big work weekend.
By Sunday night, 8 pm, I had finished the last piece. I had to measure and cut to go around 2 windows and 2 doors and was lucky to be vertical and alert after 2 graveyard shifts at my weekend job, 8 hours of sleep total for the entire weekend and hours on my feet each afternoon and partial evening, hanging wallpaper. I also had a really interesting hairdo from the pasted wallpaper flopping down on to my head all the time - it would pretty much keep any shape I wanted! My goal was to have the room ready for me to sleep in Sunday night and to be on the couch by 9 pm to watch Masterpiece Theater on PBS!Well, it was 9:30 pm and I finally sat down. The wallpaper was up and trimmed away from mouldings and floors, the bed was put together and made, the bedside table I had hand painted a few months back (see earlier blog post) was in place and the settee from the living room was pushed around the corner and on to the north bedroom wall.I dug out 2 matching glass lamps from storage I had bought from the Target Simply Shabby Chic line years ago, along with the matching curtains in British Rose and will use them in the room until I can afford something better.The chandelier was hung a few months back and put on a dimmer. The glass chandelier was a real bargain - 17" four-arm from the website: greatchandeliers.com.Henry was the first one on the bed. He was exhausted from watching me scrambling all weekend! The other kitties also came and poked around, exploring the new space.Yet to come: egg and dart crown and new baseboard, painting the window trim white, polished brass switch plate and outlet covers, adding some artwork and another bedside table (which is being painted white right now - an old, shabby wicker side table)I'll post updated images as the room progresses.I hope you enjoy the pictures - some were taken that Sunday night and the others the next morning. I threw in a couple of "before" images so you could see the empty room.
I was shooting for a mix of Gustavian, Shabby Chic and country. I think I nailed it!

 I have four of these old wicker-backed chairs.Three armless and one with arms.I found them, abandoned alongside a Seattle street almost 2 years ago.I passed them up on my way to work but came back for them during lunchtime.They were still there so I stopped, swooped them up into my pickup and drove them home before returning to work.My then-boyfriend rolled his eyes when he got home.He'd seen them that morning too, on his way to work and had a funny feeling that I would be the one picking them up! hahaI kept them in storage until last summer when he showed me how to take them apart and hammer, screw and glue them back together so they no longer wobbled.I removed the old, stained burgundy fabric seats and tossed them away.A few weeks ago when I took a day off to paint the inside of my new front door, I set 2 of them up on a work table outside and KILZ spray primed the wicker, then brush primed the rest of the frame and later base coated them with Waverley's Cottage Linen White.Last night I decided to cover the seats with this fabric I had on a bolt, from an online order about 2 years back. It's a pretty blue rose/floral on a rough canvas weave fabric, but very soft to the hand.I had the foam already bought and waiting for the moment - just had to cut it to size of the wooden seat which I had removed to paint the chair. I let a little bit overhang.Then I covered the foam with a soft, lightweight cotton fabric, stapling it on the underside.Finally came the lovely blue floral fabric, also stapled onto the underside.Once done, I could stand back and finally feel a sense of accomplishment.I sat very comfortably on the armless chair but my butt was too big for the one with arms so only skinny friends will be invited to sit there. hahaThis transformation was a long time in coming but soon they will sit at their place around me large dining room table. I hope to have many friends over to use them!Stay tuned for later in the summer when my now ex-boyfriend moves out and I reclaim the large room we now call the family room, as my dining room.It is 20' x 20' with low ceilings and a wood burning stove in the corner (which is used to partially heat the house all winter).I will paint the walls a pale spring green and hang gold framed botanical prints all over them.Not liking the ugly, stained carpet, we ripped it out to expose the cement floor underneath.I was promised a new floor would be laid if I only bought the flooring so I ran out and found a 16" square sandstone colored tile on sale at Home Depot. It was what I could afford at the time but I also loved the look and the cement floor (once belonging to the garage it was converted from) made it hard to lay a wood floor (out of my budget's reach any ways!)Four years later the promise is unfulfilled but I'm hoping he will lay it once he moves all his stuff out of the room.In the mean time, my painted ladies await their spot around the elegant dining table a dear friend gave me...a table that seats 16 and which came with 2 beautiful Irish white linen damask tablecloths and matching napkins.I can't wait for the transformation to be complete!!